
Vape cartridges may look small, but filling them the right way takes care and structure. Professional setups follow clear steps to keep quality steady and waste low. Each stage plays a role in accuracy, cleanliness, and consistency. This article breaks down the five core steps used in professional vape cartridge filling. The goal is simple: explain what happens at each stage and why it matters.
Many production teams rely on tools like a vape cartridge filling machine to bring control and repeatability into the process. These machines act as practical aids rather than selling points. The sections below walk through how professional filling works, step by step, and how each part fits into a smooth production flow.
Step 1: Focus on Material Preparation
Every professional process starts with preparation. The oil or liquid must reach the right consistency before filling begins. Temperature control matters here. Thick material causes uneven fills, while thin material can leak or overflow. Most cannabis distillates perform best when heated to between 50–65°C (122–149°F), though thicker concentrates like live resin or high-terpene extracts may need temperatures closer to 40–50°C to preserve volatile compounds. The goal is hitting a viscosity that flows consistently, typically around 10,000–30,000 centipoise for standard 510-thread cartridges. Too thick and you’ll get incomplete fills. Too thin and you risk flooding the coil before the customer ever takes a draw.
Preparation also includes checking cartridges and tools for defects. Clean surfaces help prevent clogs and contamination. Teams confirm viscosity, batch readiness, and equipment settings at this stage. When preparation stays consistent, the rest of the process runs with fewer interruptions.
Step 2: Ensure Proper Vape Cartridge Placement
Correct placement protects accuracy. Each cartridge must sit straight and secure before filling starts. Poor alignment leads to spills or partial fills. Professionals take time to confirm positioning.
Common placement checks include:
- The cartridge sits level in the holder
- Nozzle aligns with the fill port.
- Seals stay intact during contact
Misalignment might seem minor until you’re running hundreds of units per hour. Even a slight tilt can cause oil to wick unevenly into the coil housing, leading to customer complaints about dry hits or leaking. Teams running high-volume operations often use jigs or trays designed for specific cartridge hardware to eliminate guesswork entirely. This step may feel simple, but it prevents costly mistakes. Stable placement supports smooth flow during filling and protects both the product and the equipment.
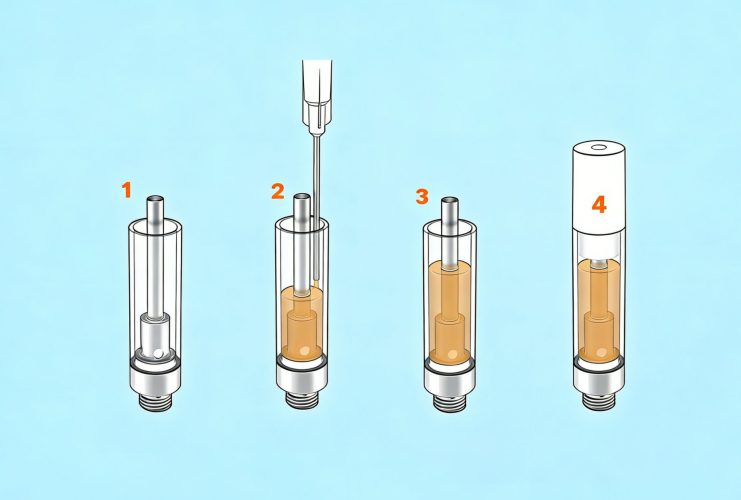
Step 3: Control the Filling Process
This step handles the actual fill. Precision matters most here. Flow rate and volume must stay consistent across every cartridge. Automated systems help control these variables.
The fill process usually follows a clear sequence:
- Start controlled flow
- Monitor volume delivery
- Stop filling at the preset level
Many teams use a vape cart filling machine at this stage to maintain repeatable results across large batches. Controlled filling reduces waste and improves uniformity. Standard 0.5mL cartridges typically require fill tolerances within ±0.02mL to meet quality standards, tight enough that manual filling becomes impractical at scale. Automated systems can maintain this accuracy across thousands of units while adjusting for variables like oil temperature drift throughout a production run. The difference between an 8-hour shift with consistent fills and one plagued by rework often comes down to this step.
Step 4: Allow Settling and Level Adjustment
Once filled, cartridges need time to settle. Liquid movement can cause bubbles or uneven levels right after filling. A short pause allows material to stabilize naturally. Depending on oil viscosity and ambient temperature, settling can take anywhere from 30 seconds to several minutes. Rushing this step is one of the most common mistakes in high-volume operations. Teams under pressure to hit quotas often skip adequate settling time, only to deal with returns and quality complaints later.
After settling, operators check the fill height. Minor adjustments may follow if levels fall outside limits. This step ensures visual consistency and avoids problems during sealing. Skipping settling usually leads to uneven products, even if the fill volume was accurate at first.
Step 5: Complete Sealing and Final Checks
Sealing closes the process. Caps or mouthpieces attach securely to prevent leaks. Proper pressure matters to avoid cracks or loose seals. After sealing, teams perform final checks.
Final review includes visual inspection, seal integrity, and random sampling. Any cartridge that fails inspection gets removed. These checks protect product quality before storage or distribution and help maintain professional standards. Most professional operations pull between 1–5% of each batch for random testing, checking for proper seal integrity, accurate fill levels, and absence of visible contaminants. Cartridges that fail get logged and traced back to identify whether the issue was material, equipment, or operator error. This feedback loop is what separates operations that scale cleanly from those that drown in quality issues.
Final Thoughts
The difference between amateur and professional vape cartridge filling isn’t any single step. It’s the discipline to execute all five consistently, batch after batch. Preparation determines whether your oil flows correctly. Placement prevents the small errors that compound into big losses. Controlled filling keeps every unit within spec. Settling avoids the quality issues that kill customer trust. And sealing locks it all in place before anything reaches the market.
Whether you’re filling 500 cartridges a day or 50,000, the fundamentals don’t change. The teams that treat each step as non-negotiable are the ones building operations that scale without chaos—and reputations that bring customers back.
